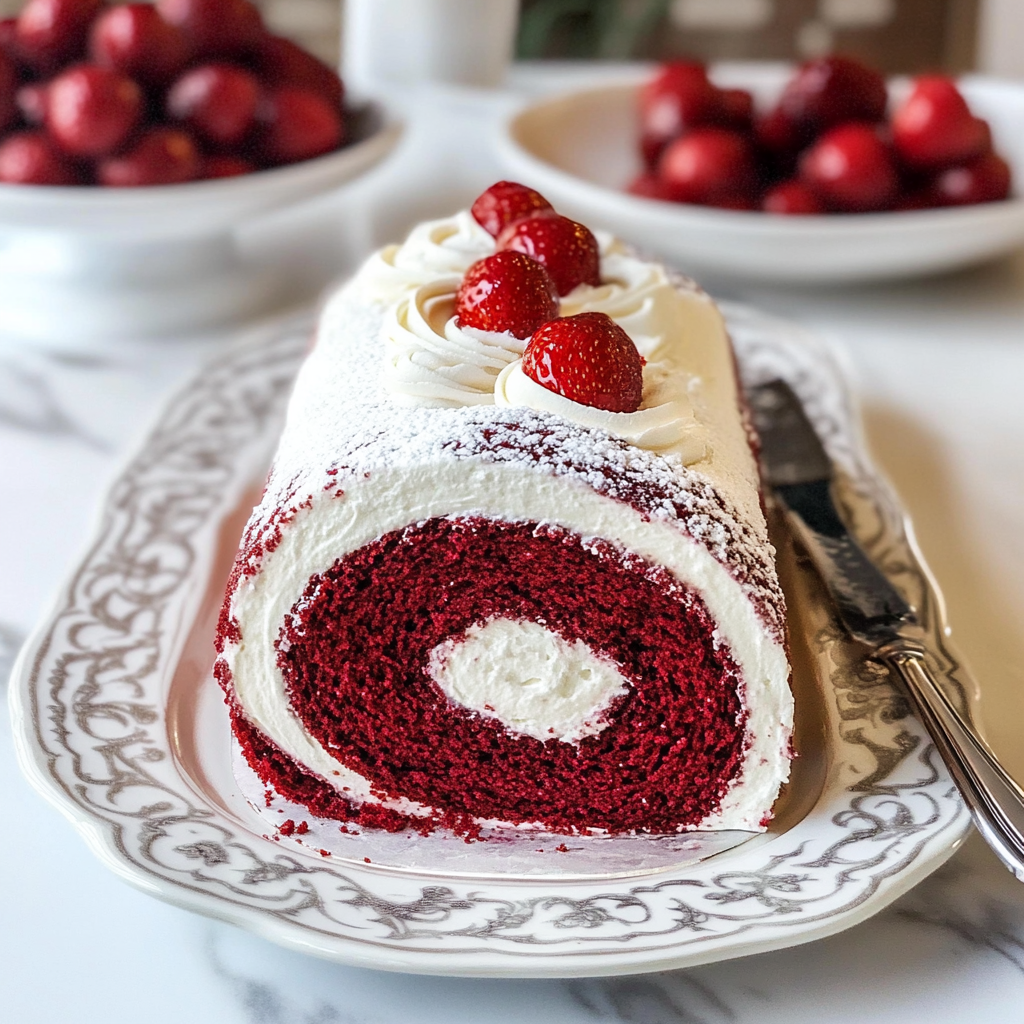
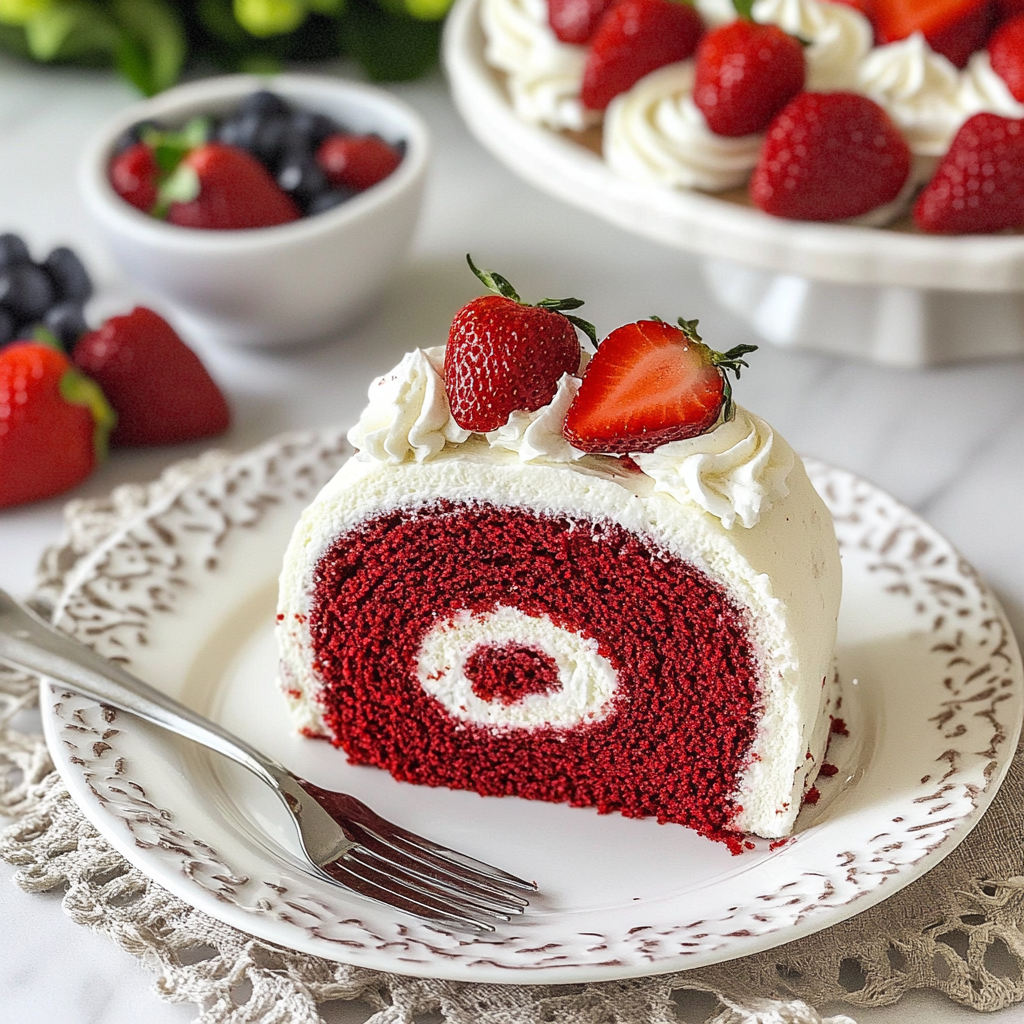
There’s something utterly magical about the combination of rich cocoa and vibrant red in a Valentine’s Red Velvet Cake Roll. Picture this: a soft, tender cake rolled up with luscious cream cheese filling, creating an irresistible treat that’s not only delicious but also looks stunning on any dessert table. The aroma wafting through your kitchen will have your loved ones swooning before they even take a bite, and trust me, the first slice will vanish faster than you can say “I love cake!”

Now, let’s be honest – Valentine’s Day can sometimes feel like a pressure cooker of expectations. You want to impress, but you also want to enjoy the process. That’s where this Valentine’s Red Velvet Cake Roll comes in like a superhero in an apron! It’s perfect for those romantic dinners or even just to indulge yourself because let’s face it—self-love is the best kind of love.
Why You'll Love This Valentine’s Red Velvet Cake Roll
- This incredible Valentine’s Red Velvet Cake Roll transforms simple everyday ingredients into restaurant-quality flavors that will blow your mind completely.
- Foolproof recipe techniques guarantee perfect results every single time, making even novice cooks feel like professional chefs instantly.
- Stunning visual appeal with gorgeous colors and mouthwatering aromas creates the ultimate Instagram-worthy dish for any special occasion.
- Endlessly adaptable for different dietary needs while working beautifully for meal prep, date nights, or entertaining large groups effortlessly.
What You’ll Need
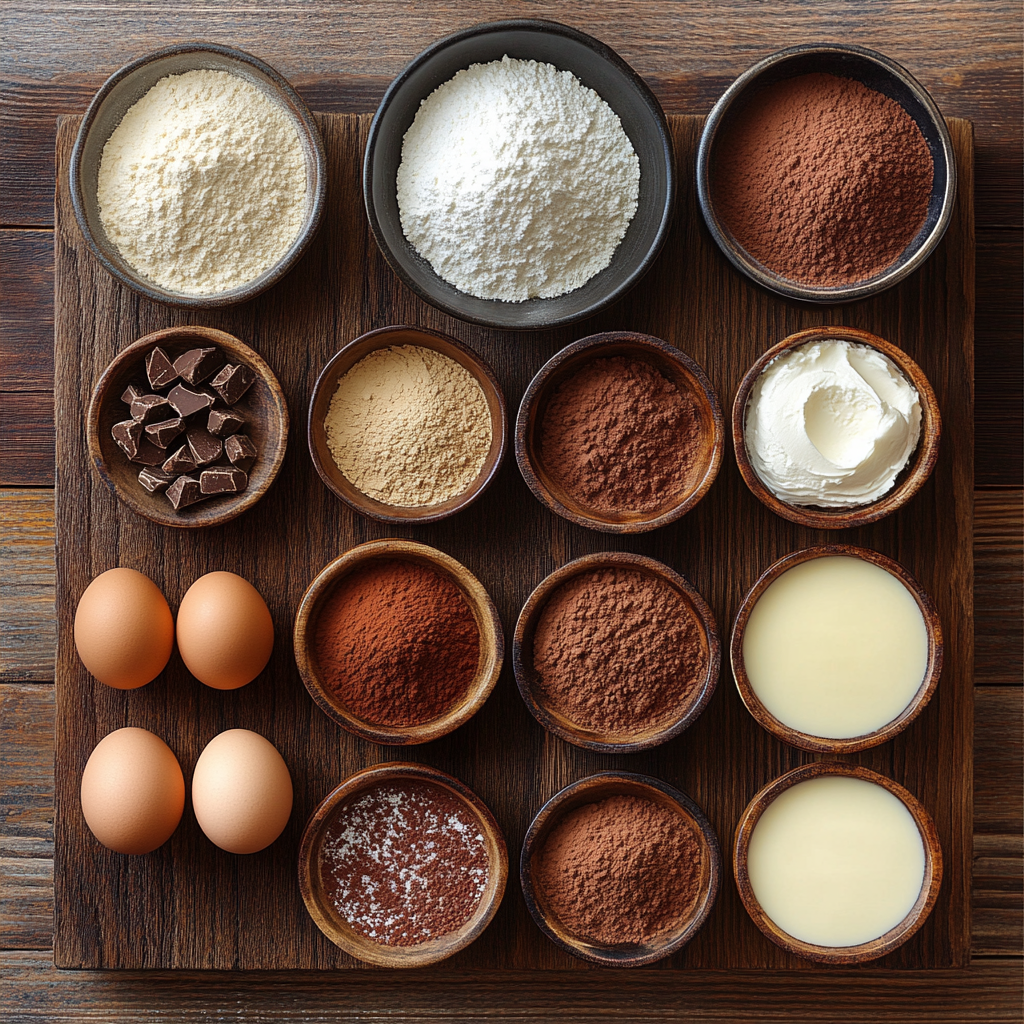
Here’s what you’ll need to make this delicious Valentine’s Red Velvet Cake Roll:
- All-Purpose Flour: The base of our cake roll; make sure it’s fresh for the best texture.
- Cocoa Powder: Use unsweetened cocoa powder for that rich chocolate flavor without added sugar.
- Sugar: Granulated sugar sweetens the cake perfectly; it balances the richness of the cocoa.
- Baking Powder and Baking Soda: These leavening agents help our cake rise beautifully.
- Salt: A pinch enhances all the flavors; don’t skip it!
- Vegetable Oil: Keeps our cake moist and tender; you can substitute with melted butter if preferred.
- Eggs: They provide structure and stability to our cake roll.
- Buttermilk: Adds moisture and tanginess; if you don’t have buttermilk, mix milk with vinegar as a substitute.
- Red Food Coloring: Essential for that classic red color; use gel food coloring for more vibrant results.
- Vanilla Extract: A splash adds warmth and depth to our flavor profile.
For the Cream Cheese Filling:
- Cream Cheese: Use full-fat cream cheese for a rich filling that pairs perfectly with our cake.
- Confectioners’ Sugar: Sweetens the filling while giving it that melt-in-your-mouth quality.
- Vanilla Extract: Just a hint provides additional flavor without overwhelming the cream cheese taste.
The full ingredients list, including measurements, is provided in the recipe card directly below.
Cooking Instructions
Follow these simple steps to prepare this delicious Valentine’s Red Velvet Cake Roll:
Step 1: Preheat Your Oven
Preheat your oven to 350°F (175°C). Grease a jelly roll pan (15×10 inches) with cooking spray or line it with parchment paper for easier removal later.
Step 2: Mix Dry Ingredients
In a bowl, whisk together flour, cocoa powder, baking powder, baking soda, and salt until well combined. Set this dry mixture aside as we make our wet ingredients come together.
Step 3: Combine Wet Ingredients
In another large mixing bowl, beat together eggs and sugar until light and fluffy. Add vegetable oil, buttermilk, red food coloring, and vanilla extract. Mix until smooth—this is where the magic happens!
Step 4: Blend It All Together
Gradually add your dry mixture into the wet ingredients, gently folding until just combined. Do not overmix; we want that fluffy texture!
Step 5: Bake
Pour your batter into your prepared jelly roll pan evenly. Bake for about 15-20 minutes or until a toothpick inserted into the center comes out clean.
Step 6: Cool & Fill
Once baked, carefully flip the cake onto a clean kitchen towel dusted with confectioners’ sugar. Remove parchment paper if used. While still warm, roll up tightly using the towel (the towel helps shape it nicely). Let cool completely before unrolling and spreading with cream cheese filling—then roll it back up!
Transfer to plates and sprinkle some extra confectioners’ sugar on top for that final touch!
You Must Know About Valentine’s Red Velvet Cake Roll
- This showstopping Valentine’s Red Velvet Cake Roll delivers restaurant-quality results using simple ingredients you probably already have at home.
- The perfect balance of textures and flavors creates an unforgettable dining experience that will have everyone asking for seconds.
- Picture-perfect presentation with vibrant colors makes this dish absolutely Instagram-worthy and guaranteed to impress any dinner guest.
- Incredibly versatile recipe that works beautifully for weeknight dinners, meal prep, special occasions, or even outdoor entertaining sessions.
Perfecting Cooking Process
To achieve the best results with your Valentine’s Red Velvet Cake Roll, start by baking the cake first. While it cools, prepare the cream cheese filling and then assemble it all once everything is ready. Efficiency is key!
Flavor Your Way
Feel free to customize your Valentine’s Red Velvet Cake Roll with various add-ins! Consider adding chocolate chips or swapping some flour for cocoa powder for extra richness. You can also experiment with different extracts like almond or coconut.
Storing & Reheating
Store your Valentine’s Red Velvet Cake Roll in an airtight container in the fridge for up to three days. To enjoy it warm, simply microwave a slice for about 15 seconds or let it come to room temperature before serving.
Chef's Helpful Tips for Valentine’s Red Velvet Cake Roll
- This professional-quality Valentine’s Red Velvet Cake Roll relies on precise timing and temperature control to achieve restaurant-standard results consistently.
- Master the art of mise en place by prepping all ingredients beforehand, ensuring smooth execution and preventing any last-minute cooking disasters.
- The secret lies in layering flavors throughout the cooking process rather than seasoning only at the end for maximum depth.
- Pro tip: let the finished dish rest for optimal texture and flavor development before serving to hungry guests waiting eagerly.
Baking this delightful roll reminds me of the time I made it for my friends’ anniversary. Their faces lit up when they took their first bite—I felt like a baking superhero!
FAQs
What is Valentine’s Red Velvet Cake Roll?
Valentine’s Red Velvet Cake Roll is a delightful dessert that combines the classic flavors of red velvet cake with a whimsical roll shape. This cake features a moist, vibrant red sponge that is often infused with cocoa and buttermilk for a rich taste. It’s typically layered with a smooth cream cheese filling, which adds to its luxurious texture. Perfect for Valentine’s Day, this dessert not only looks stunning but also delivers a deliciously sweet flavor that is sure to impress your loved ones.
How do I store Valentine’s Red Velvet Cake Roll?
To keep your Valentine’s Red Velvet Cake Roll fresh, store it in an airtight container in the refrigerator. This will ensure the cake remains moist and the cream cheese filling stays creamy. If you plan to enjoy it later, consider wrapping it tightly in plastic wrap before placing it in the container. This dessert can last up to three days in the fridge. For longer storage, you can freeze individual slices, allowing you to savor them even after the special day has passed.
Can I make Valentine’s Red Velvet Cake Roll ahead of time?
Absolutely! You can prepare your Valentine’s Red Velvet Cake Roll ahead of time. Bake the cake and let it cool completely before rolling it with the cream cheese filling inside. After rolling, wrap it tightly and refrigerate for up to 24 hours before serving. This allows the flavors to meld beautifully. Just remember to dust it with powdered sugar or drizzle with chocolate right before serving for that beautiful presentation.
What occasions are perfect for serving Valentine’s Red Velvet Cake Roll?
While Valentine’s Day is the most popular occasion for serving Valentine’s Red Velvet Cake Roll, it’s also great for anniversaries, birthdays, or any romantic celebration. Its stunning appearance makes it suitable for weddings or dinner parties as well. The rich flavors and beautiful color add a touch of elegance to any event, making it a memorable choice for sharing love through delicious desserts.
Conclusion
In summary, the Valentine’s Red Velvet Cake Roll is an exquisite dessert that perfectly captures romance and flavor. With its vibrant red hue and delicious cream cheese filling, it’s an ideal treat for special occasions like Valentine’s Day or anniversaries. Storing and preparing this cake roll ahead of time ensures you can enjoy its delightful taste without stress on the big day. Treat your loved ones with this show-stopping dessert that promises to impress and satisfy every sweet tooth!

Valentine’s Red Velvet Cake Roll
- Total Time: 40 minutes
- Yield: Serves approximately 10 slices 1x
Description
Valentine’s Red Velvet Cake Roll is a stunning dessert that beautifully combines the rich flavors of cocoa with a vibrant red hue. This moist and tender cake is rolled with a luscious cream cheese filling, making it an impressive centerpiece for any romantic occasion. Perfect for Valentine’s Day, anniversaries, or special gatherings, this delightful treat will leave your loved ones swooning before the first bite.
Ingredients
- 1 cup all-purpose flour
- 1/2 cup unsweetened cocoa powder
- 1 cup granulated sugar
- 1 tsp baking powder
- 1/2 tsp baking soda
- 1/4 tsp salt
- 1/2 cup vegetable oil (or melted butter)
- 3 large eggs
- 1/2 cup buttermilk (or milk + 1 tsp vinegar)
- 2 tbsp red food coloring (gel recommended)
- 1 tsp vanilla extract
- 8 oz full-fat cream cheese
- 1 cup confectioners’ sugar
- 1 tsp vanilla extract
Instructions
- Preheat oven to 350°F (175°C). Grease a jelly roll pan (15×10 inches) or line with parchment paper.
- In a bowl, whisk together flour, cocoa powder, baking powder, baking soda, and salt. Set aside.
- In another bowl, beat eggs and sugar until light and fluffy. Mix in vegetable oil, buttermilk, red food coloring, and vanilla extract until smooth.
- Gradually fold in dry ingredients until just combined; avoid overmixing.
- Pour batter into the prepared pan and bake for 15-20 minutes until a toothpick comes out clean.
- Once baked, flip the cake onto a clean kitchen towel dusted with confectioners’ sugar. Roll up the cake with the towel while warm and let cool completely.
- Unroll the cooled cake gently and spread the cream cheese filling evenly. Roll it back up without the towel. Dust with additional confectioners’ sugar before serving.
- Prep Time: 20 minutes
- Cook Time: 20 minutes
- Category: Dessert
- Method: Baking
- Cuisine: American
Nutrition
- Serving Size: 1 slice (approximately 70g)
- Calories: 220
- Sugar: 22g
- Sodium: 150mg
- Fat: 10g
- Saturated Fat: 4g
- Unsaturated Fat: 5g
- Trans Fat: 0g
- Carbohydrates: 30g
- Fiber: <1g
- Protein: 3g
- Cholesterol: 30mg