Pumpkin pie with gingersnap crust is a delightful twist on the classic dessert that will leave your taste buds dancing with joy. Imagine a rich, creamy filling infused with spices, nestled in a crunchy, sweet gingersnap crust that perfectly complements the pumpkin’s natural sweetness. It’s like a cozy hug for your palate, perfect for those chilly autumn evenings.

This pie isn’t just about flavor; it’s a nostalgic trip down memory lane. Picture yourself at family gatherings during the holidays, where laughter fills the air and the scent of baked goods wafts through the kitchen. As everyone gathers around the table, this pumpkin pie with gingersnap crust steals the spotlight, evoking smiles and warm memories. Trust me; each slice promises to transport you to those joyful times.
Why You'll Love This Pumpkin Pie with Gingersnap Crust
- This incredible Pumpkin Pie with Gingersnap Crust transforms simple everyday ingredients into restaurant-quality flavors that will blow your mind completely.
- Foolproof recipe techniques guarantee perfect results every single time, making even novice cooks feel like professional chefs instantly.
- Stunning visual appeal with gorgeous colors and mouthwatering aromas creates the ultimate Instagram-worthy dish for any special occasion.
- Endlessly adaptable for different dietary needs while working beautifully for meal prep, date nights, or entertaining large groups effortlessly.
What You’ll Need
Here’s what you’ll need to make this delicious Pumpkin Pie with Gingersnap Crust:
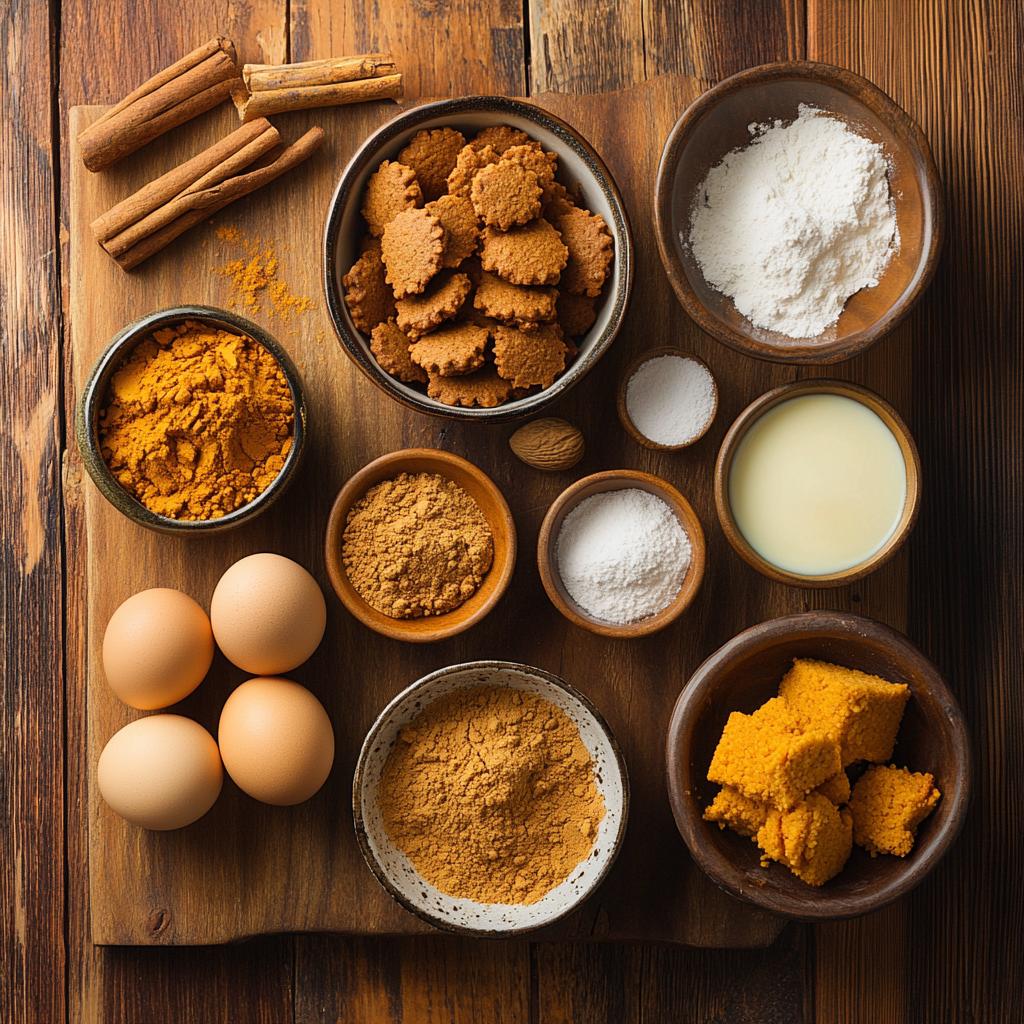
- Gingersnap Cookies: Choose a high-quality brand for maximum crunch and flavor; these form the base of your crust.
- Unsalted Butter: Melted butter adds richness to the crust while keeping it together—be sure it’s unsalted to control overall seasoning.
- Canned Pumpkin Puree: Go for pure pumpkin puree, not pumpkin pie filling; this ensures you control the sweetness and spices.
- Granulated Sugar: A touch of sugar balances the spices in the filling but adjust based on your preference.
- Brown Sugar: Brown sugar adds depth and moisture to the filling—it’s like a cozy blanket on top of your pumpkin!
- Spices (Cinnamon, Nutmeg, Ginger): Freshly ground spices are best; they elevate the flavor profile to a whole new level.
- Heavy Cream: This makes your filling luxuriously creamy—don’t skimp on it!
- Eggs: Eggs help bind everything together while giving structure to your filling; always use large eggs.
The full ingredients list, including measurements, is provided in the recipe card directly below.
Cooking Instructions
Follow these simple steps to prepare this delicious Pumpkin Pie with Gingersnap Crust:
Step 1: Preheat Your Oven
Preheat your oven to 350°F (175°C). This step is crucial because no one likes a cold pie when it could be warm and comforting!
Step 2: Crush Those Gingersnaps
In a food processor or by hand, crush about two cups of gingersnap cookies until fine crumbs form. It should resemble sandy beach vibes—just don’t get too lost in daydreaming about vacations!
Step 3: Mix Your Crust
In a mixing bowl, combine crushed gingersnaps with melted butter until well mixed. The mixture should hold together when pressed—it’s basically edible sandcastle material.
Step 4: Form The Crust
Press the crumb mixture firmly into a pie dish evenly across the bottom and up the sides. Make sure there are no gaps; we want this crust to be strong enough to hold all that delicious filling!
Step 5: Prepare The Filling
In another bowl, whisk together canned pumpkin puree, granulated sugar, brown sugar, spices, heavy cream, and eggs until smooth and creamy. This mixture will smell like autumn in a bowl!
Step 6: Bake The Pie
Pour the filling into your prepared gingersnap crust and bake in preheated oven for about 50-60 minutes until set in the center (a little jiggle is okay). Allow it to cool slightly before serving.
Transfer to plates and drizzle with whipped cream or serve as is for an amazing treat!
And there you have it—a delightful Pumpkin Pie with Gingersnap Crust that’s sure to impress family and friends alike! Enjoy every bite as you revel in its unique flavors and textures.
You Must Know About Pumpkin Pie with Gingersnap Crust
- This showstopping Pumpkin Pie with Gingersnap Crust delivers restaurant-quality results using simple ingredients you probably already have at home.
- The perfect balance of textures and flavors creates an unforgettable dining experience that will have everyone asking for seconds.
- Picture-perfect presentation with vibrant colors makes this dish absolutely Instagram-worthy and guaranteed to impress any dinner guest.
- Incredibly versatile recipe that works beautifully for weeknight dinners, meal prep, special occasions, or even outdoor entertaining sessions.
Perfecting Cooking Process
To achieve the best results, start by preparing your gingersnap crust first. While it bakes, mix the pumpkin filling. This way, everything comes together seamlessly, and you avoid last-minute chaos in the kitchen that could scare off the neighbors.
Flavor Your Way
Feel free to customize your Pumpkin Pie with Gingersnap Crust by adding a pinch of nutmeg or swapping out some sugar for maple syrup. You can also experiment with a splash of bourbon or rum for an adult twist that will have your guests raising their eyebrows in delight!
Storing & Reheating
Store any leftover Pumpkin Pie with Gingersnap Crust in an airtight container in the refrigerator for up to five days. To reheat, simply place slices in a microwave for 20-30 seconds or enjoy it cold if you’re feeling adventurous!
Chef's Helpful Tips for Pumpkin Pie with Gingersnap Crust
- This professional-quality Pumpkin Pie with Gingersnap Crust relies on precise timing and temperature control to achieve restaurant-standard results consistently.
- Master the art of mise en place by prepping all ingredients beforehand, ensuring smooth execution and preventing any last-minute cooking disasters.
- The secret lies in layering flavors throughout the cooking process rather than seasoning only at the end for maximum depth.
- Pro tip: let the finished dish rest for optimal texture and flavor development before serving to hungry guests waiting eagerly.
Making this delightful dessert brings back fond memories of holiday gatherings where friends would dive into my pumpkin pie as if it were the last slice on Earth, leaving only crumbs behind as evidence of their crime!
FAQs
What is Pumpkin Pie with Gingersnap Crust?
Pumpkin Pie with Gingersnap Crust is a delightful twist on the classic pumpkin pie. This dessert features a crisp and spicy crust made from crushed gingersnap cookies, which adds a unique flavor profile to the traditional sweet and creamy filling. The combination of pumpkin and warm spices like cinnamon and nutmeg creates a comforting treat perfect for autumn celebrations. The gingersnap crust not only enhances the taste but also provides a lovely crunch, making each bite an enjoyable experience.
How do I make the gingersnap crust for my pumpkin pie?
To create the gingersnap crust for your pumpkin pie, start by crushing gingersnap cookies into fine crumbs. Combine these crumbs with melted butter and a bit of sugar until well mixed. Press this mixture firmly into the bottom and up the sides of a pie pan to form an even layer. Bake it in the oven for about 10 minutes at 350°F to set the crust before adding your pumpkin filling. This step ensures that your crust will hold its shape while providing that delicious spiced flavor.
Can I use a store-bought crust instead of making a gingersnap crust?
Yes, you can definitely use a store-bought crust if you’re short on time or prefer convenience. A regular pie crust or even a graham cracker crust can work well as alternatives. However, if you want to capture the unique flavors of Pumpkin Pie with Gingersnap Crust, consider trying to find pre-made gingersnap cookie dough or frozen gingersnap shells at your local grocery store. This way, you can still enjoy that distinctive taste without the extra effort.
What are some tips for perfecting my pumpkin pie filling?
To achieve the best pumpkin pie filling, start with high-quality pureed pumpkin, preferably fresh or canned without additives. Be sure to mix in spices like cinnamon, ginger, nutmeg, and cloves for warmth and depth of flavor. Adding eggs will help set the filling while cream or evaporated milk contributes to its richness. Whisk all ingredients thoroughly until smooth, then pour into your prepared gingersnap crust. Baking at a consistent temperature ensures that your filling cooks evenly without cracking.
Conclusion
In summary, Pumpkin Pie with Gingersnap Crust is an innovative and delectable take on a beloved classic dessert. By using crushed gingersnap cookies for the crust, you add both flavor and texture that elevates your dining experience. Remember to pay attention to your filling ingredients and baking techniques for optimal results. This dessert not only satisfies sweet cravings but also brings warmth to any fall gathering, making it an essential recipe for your seasonal celebrations. Enjoy every slice!

Pumpkin Pie with Gingersnap Crust
- Total Time: 1 hour 15 minutes
- Yield: Serves 8
Description
Pumpkin Pie with Gingersnap Crust combines the warm, comforting flavors of pumpkin and spices with a crunchy, sweet gingersnap crust. This delightful dessert is perfect for autumn gatherings and holiday celebrations, bringing joy and nostalgia to every slice. Its unique twist on the classic pumpkin pie makes it a standout at any table, ensuring your guests will be asking for seconds.
Ingredients
- 2 cups gingersnap cookies, crushed
- 1/2 cup unsalted butter, melted
- 1 can (15 oz) pure pumpkin puree
- 3/4 cup granulated sugar
- 1/4 cup brown sugar
- 1 tsp ground cinnamon
- 1/2 tsp ground nutmeg
- 1/2 tsp ground ginger
- 1 cup heavy cream
- 3 large eggs
Instructions
- Preheat your oven to 350°F (175°C).
- In a bowl, combine crushed gingersnap cookies and melted butter; mix until well combined. Press the mixture into a pie dish to form the crust.
- Bake the crust for about 10 minutes until set; remove from oven.
- In another bowl, whisk together pumpkin puree, granulated sugar, brown sugar, spices, heavy cream, and eggs until smooth.
- Pour the filling into the baked crust and bake for 50-60 minutes until set in the center.
- Let cool slightly before serving.
- Prep Time: 15 minutes
- Cook Time: 60 minutes
- Category: Dessert
- Method: Baking
- Cuisine: American
Nutrition
- Serving Size: 1 slice (125g)
- Calories: 320
- Sugar: 20g
- Sodium: 150mg
- Fat: 18g
- Saturated Fat: 10g
- Unsaturated Fat: 7g
- Trans Fat: 0g
- Carbohydrates: 37g
- Fiber: 2g
- Protein: 5g
- Cholesterol: 90mg